User guide: Prince Edward Island shellfish aquaculture leasing map
This map shows the location of current shellfish aquaculture leasing and new shellfish aquaculture application in Prince Edward Island.
On this page
1. Map tools
These icons are positioned horizontally on the right side of the screen within the map.

The Bookmark icon looks like a book and is located in the top right corner of the screen.
The Bookmark allows users to save their current view of the map for future consultation. See section 5. Bookmarks.

The Draw icon looks like a paint tray palette and is located in the top right corner of the screen.
The Draw tool allows users to draw simple graphics and insert text on the map.

The Measurement icon looks like a ruler and is located in the top right corner of the screen.
The Measurement tool allows users to obtain the size of an area on the map, the distance covered by a line or to find the coordinates of a point.
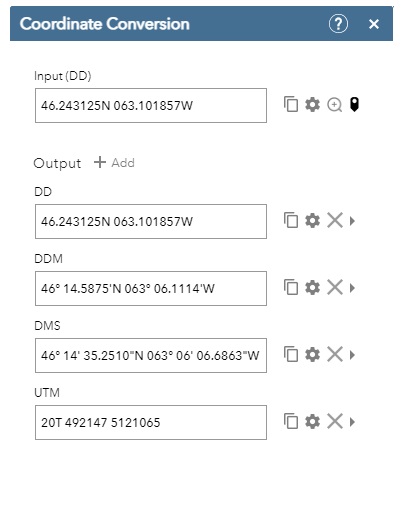
The Coordinate Conversion icon looks like a split arrow with the letters XYZ in the middle and is located in the top right corner of the screen.
The Coordinate Conversion tool allows users to enter coordinates using one coordinate system and convert them to different coordinate formats. See section 6 - Coordinate Conversion of point on map.

The Print button looks like a printer and is located in the top right corner of the screen.
The Print tool will print the current map. Name the print output:
- select the layout and page size or map only
- select the file type
- click the Advanced button to access the other print settings
2. Navigation

Zooms in for closer inspection of the map.

Zooms out and get a larger view of an area.

The home icon zooms the map to the default view.

The back and forward arrow buttons allow you to skip back and forth to locations you have previously viewed.
3. Search
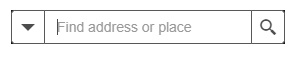
Users can use the search window to search and zoom to addresses, places, aquaculture leases, spat licences, or applications. The search window can be found in the top left corner of the map.
Selecting from the search list
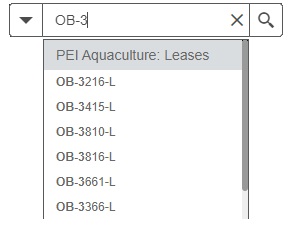
To search for a lease number, click within the search bar and begin to type out the lease number. All lease numbers start with either “BOT”, “SUR”, or “OB” depending on the lease type. For more information on the different types of shellfish aquaculture leases within Prince Edward Island please see the Prince Edward Island shellfish aquaculture leasing policy.
A list will begin to auto populate below the search bar as you type in more values. When the lease number you are searching for appears in the auto populated list below, click the lease number. The map will automatically center and zoom to the lease number you have selected.
The same process can be used to search for application numbers, licence numbers and locations.
4. View
These icons are positioned horizontally in the top left corner of the screen.

The Layer List icon looks like 3 pieces of paper stacked on top of each other and is located to the top left corner of the screen.
The Layer List allows users to add or remove certain features to the map. You can turn layers on and off and view sublayers.

The Legend button has 3 horizontal lines and is located in the toolbar in the top left corner of your screen.
The Legend displays labels and symbols for layers in the map. This is a good place to find out which layers are turned on and what they look like.

The Add Data button is a + on top of a loose piece of paper and is located in the toolbar in the top left corner of your screen.
The Add Data tool gives you options for adding new temporary data layers to the map. Data from a curated list of marine spatial planning-relevant datasets, URLs, ArcGIS Online and some file formats can be added from here.

The Basemap Gallery button looks like a square window with 4 panes and is located in the toolbar in the top left corner of your screen.
It presents a collection of general base maps users can select to change the appearance of their map.

The Info button is a question mark in a circle and is located in the toolbar in the top left corner of your screen.
This info tool provides a brief overview of some of the features within the application.
5. Bookmarks
Bookmarking the current map view can be done from the Bookmark icon  on the top right side of the screen.
- To create your own bookmarks, after clicking on the Bookmark icon, click on the Add button then enter a name. This will bookmark the current map view. New bookmarks are stored locally on your desktop computer or your mobile device.

6. Measure
Area
- Click on the Measurement icon
 on the top right side of the screen.
 - To measure an area, select the icon with a ruler surrounded by a shape.

On the map, click where you want to position the first corner of the area you want to measure. Then, bring your cursor to where you want to position another corner of the area and click again. Repeat these steps until you are satisfied with the shape. Double-click to close the shape. - The measurement will be displayed in the Measurement box at the right side of the screen. You can select the unit of length of your choice from the drop-down menu.
Distance covered by a line
- Click on the Measurement icon
 on the top right side of the screen.
 - To measure a distance covered by a line, select the icon with a ruler and two arrows pointing in opposite directions.
On the map, click where you want to start to measure the line. Then, bring your cursor to where you want the line to make a turn and click again. That will create a pivot point. Bring your cursor to the next pivot point and click. Repeat these steps until you are satisfied with the line. Double-click to finish the line. - The distance covered by the line will be displayed in the box at the right side of the screen. You can select the unit of length of your choice from the drop-down menu.
7. Coordinates
Obtaining coordinates of a point
- To obtain the coordinates of a point, select the icon with a square covered by a plus sign.

On the map, click on a point. - The coordinates will be displayed in the box at the right side of the screen. You can view the coordinates in Degrees/Minutes/Seconds (DMS) or in Decimal Degrees (Degrees) by selecting the format of your choice in the drop-down menu.
Converting coordinates from a specific point on the map
- Click on the Coordinate Conversion icon
 on the top right side of the screen
 - Click on the Add Point
 icon found at the right end of the Input (DD) line in the Coordinate Conversion tool and then select a point on the map. The Add Point feature will drop a pin
  on the map at the location you have selected.
 - The Coordinate Conversion tool will then add the coordinates from the selected location and will convert them to the different formats and systems available in the drop down. The conversion may take several seconds to complete.